

Artemia Culture for Intensive Finfish and Crustacean Larviculture
ID
600-106 (CNRE-60P)
 EXPERT REVIEWED
Introduction
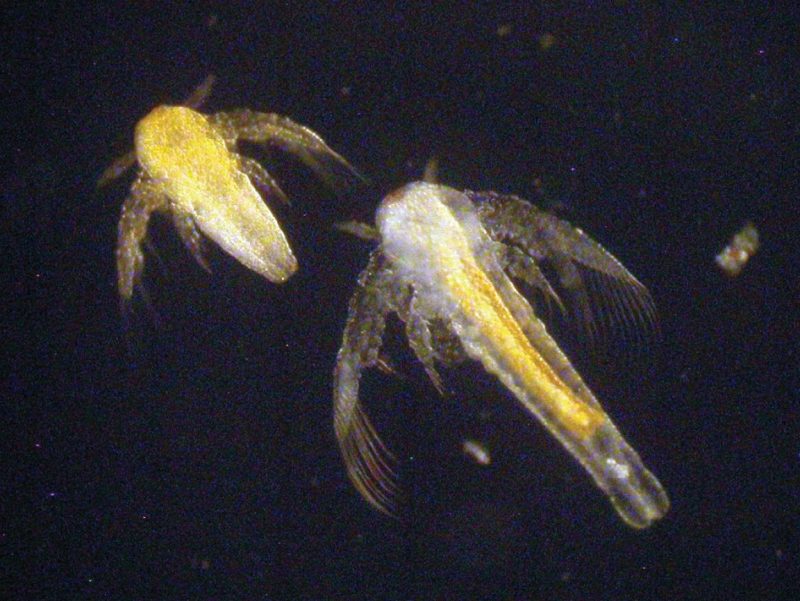
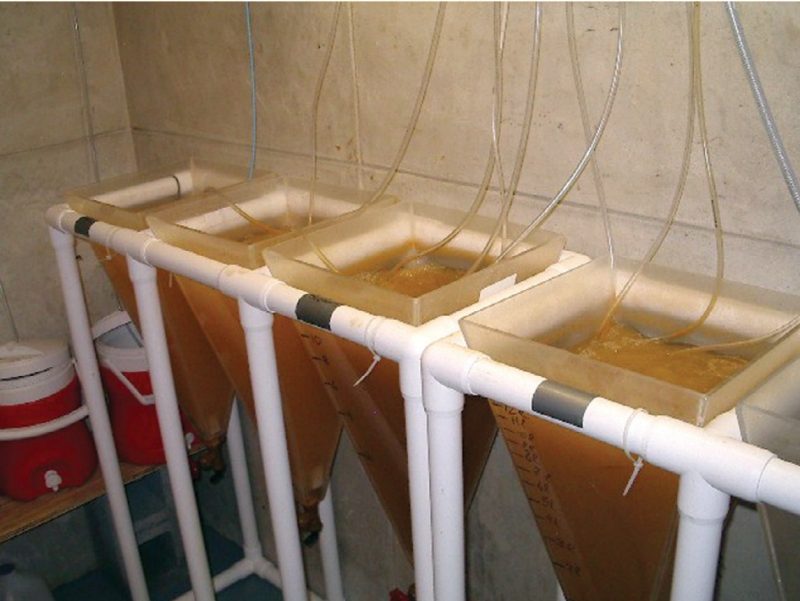
In Virginia and throughout the United States, freshwater and saltwater finfish and shrimp aquaculture is expanding rapidly. During the cultivation of most marine finfish and shrimp species as well as some freshwater species live feeds are an essential component during the larviculture stage. During larviculture, the rotifer is the most commonly used live feed upon transition of the larvae from endogenous (internal energy reserves) to exogenous (external) feeding. Upon completion of the rotifer stage, the most commonly used live feed prior to conversion of the larva to a dry diet is Artemia (Figure 1).
As a food source for the larvae, it is imperative that Artemia is of high quality, as nutritionally complete as possible, and maintained in this state until consumed by the larvae. There are four distinct stages involved in Artemia culture. These stages are: (1) decapsulation, (2) hatching, (3) enrichment, and (4) storage. Artemia also represent a potential vector for disease introduction into the larvi-culture production system. As such, all Artemia production and storage procedures must be conducted utilizing hygienic production protocols and proper hatchery sanitation procedures. This document provides the background, rationale, and detailed production protocols for all stages of high-quality Artemia culture.
Decapsulation of Artemia Cysts
Rationale
Artemia represent one of the few live feeds that can be cultured in sufficient numbers and are of appropriate size for larvae to transition to between rotifers and weaning diets. During a portion of their life cycle, Artemia hibernate as a desiccated cyst that is capable of withstanding extreme environmental conditions for long periods of time. Cysts are easily shipped and are thus the form purchased by hatcheries.
However, Artemia cysts can cause problems during larviculture because:
- The shell of the cyst is indigestible and may cause intestinal blockage when ingested by larva.
- Will occupy intenstinal space that could be holding nutrients
- Cysts themselves have no nutritional value.
- Cysts are a potential vector for pathogen introduction to the culture system.
- Artemia consume high levels of endogenous energy reserves when hatching through the cyst shell.
- Cysts must be physically separated from the live Artemia after hatching.
Decapsulation of Artemia cyst is a process whereby the external shell or chorion is chemically removed from the cyst. This process addresses the concerns noted above and has become standard practice by fish hatcheries looking to produce high quality Artemia.
Artemia Decapsulation Requirements
Artemia cysts: 1 kilogram (kg)
Decapsulation vessel: 20 liters (L)
Chlorine bleach (NaOCl; 5.5%): 8 L at 2-10 degrees Celsius (°C)
Sodium hydroxide (NaOH; 40%): 4 L at 2-10°C
Sodium thiosulfate (Na2S2O3 ): 100 g
Harvest bag: 100 micrometer (µm)
Artemia Decapsulation Procedure
Hydration
The first step in the decapsulation procedure is Artemia cyst hydration. Hydration of cysts allows for separation of the nauplii from the chorion, facilitating the decapsulation process. For this step, Artemia cysts are placed in either fresh or saltwater at room temperature for approximately one hour, using a concentration of 1 g of cysts per 15 milliliters (ml) of water. It is important during this step to maintain sufficient mixing via aeration to keep cysts well suspended. After one hour of hydration, the water and hydrated cysts should be drained through a 100 µm harvest bag; the concentrated cysts are then placed back into the empty decapsulation vessel.
Decapsulation
For decapsulation, pour the chilled sodium hydroxide solution into the decapsulation vessel with hydrated cysts, again making sure there is adequate aeration within the vessel to keep cysts suspended. The chilled bleach should then be added to the cysts to initiate the decapsulation process. Because the chemical reaction during decapsulation is exothermic, it is helpful to begin with chemical solutions chilled to a temperature of 2°C to 10°C. These starting temperatures will prevent the temperature of the chemical solution from exceeding 35°C, which may damage the cysts.
As decapsulation progresses, the chorion is chemically removed, resulting in the cysts gradually changing color from brown to grey, then to orange, and finally to bright orange. This bright orange color indicates that the process is complete. (Cyst buoyancy can also be used as an endpoint indicator: when approximately 90 percent of cysts sink, the process is complete.)
The process should take from one to three minutes, but time may differ due to temperature variations. Cysts can easily be damaged by overexposure to the decapsulation solution, adversely affecting the resulting hatch rate. It is imperative to closely monitor the process and standardize it for your particular conditions.
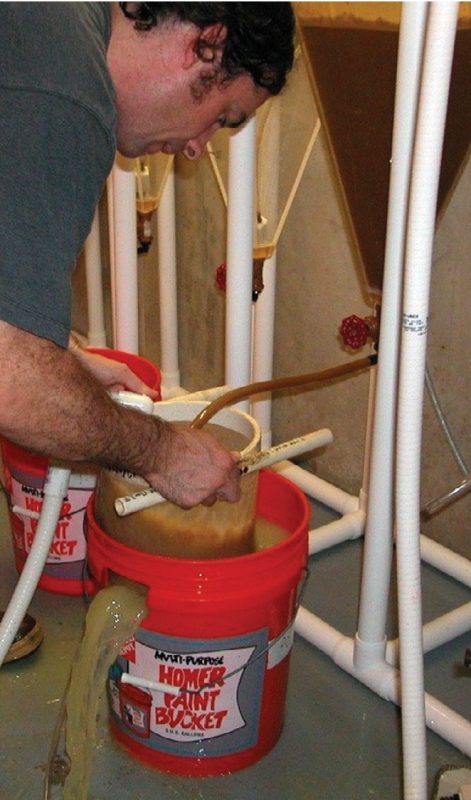
Harvest
When it is determined that the cysts are adequately decapsulated, add 75 g of sodium thiosulfate to the decapsulation vessel to neutralize the chlorine, then immediately begin to drain cysts into the 100 µm harvest bag. During the harvest process (Figure 2), rinse with ample amounts of water (fresh or salt) while providing ample aeration via an air stone to keep decapsulated cysts in suspension. When all decapsulated cysts have been collected, the remaining sodium thiosulfate should be added to the harvest bag. Continue rinsing the bag until water runs clear and no presence of chlorine can be detected.
Storage
Decapsulated cysts can be drained of excess water and stored in an airtight container in a refrigerator for up to two weeks. For longer-term storage (two months or more), cysts must be dehydrated by placing them in aerated brine (330 g of sodium chloride [NaCl] per liter of water) at the concentration of 1 g of cysts per 20 ml of brine for 24 hours. They can then be drained and placed into a suitable container, topped with fresh brine, and placed in a refrigerator.
Hatching of Artemia Cysts
Rationale
While it is a straightforward process, proper hatching and harvesting of Artemia nauplii is vital to maximizing quality. Standardization of protocols is important, as slight deviations in the process profoundly affect the hatching rate, nutritional makeup, and final size of the harvested nauplii. Artemia cysts are expensive, making them one of the largest variable costs for a hatchery. As a result, every attempt must be made to maximize hatch rate and quality. Furthermore, because the risk of pathogenic contamination is high, biosecurity measures should be in place to minimize this risk.
Artemia Hatching Requirements
Temperature: 26-30°C
pH: 8.0-9.0
Dissolved oxygen: < 4 mg/L <
Light level: ~2000 lux
Salinity: 25-35 parts per thousand (ppt)
Hatching density: ≤ 2 g dry cysts/L (up to 5 g/L with supplemental O2)
Sodium bicarbonate (NaHCO3): 0.5 g/L
Antifoam (silicone based): 1 ml/100 L
Artemia Hatching Procedure
Fill a clean, cone-bottomed hatching tank with warm, filtered seawater. If warm seawater is not available, allow enough lead time for water to be warmed to 26°C to 30°C in the hatching tank via submersible heaters. Add 0.5 g of sodium bicarbonate per liter of water in order to maintain the pH between 8.0 and 9.0 throughout the entire hatching process. The use of antimicrobial products such as INVE’s Hatch Controller (INVE, Salt Lake City, Utah) can be used to help minimize growth of pathogenic bacteria in the hatching tank. The proper stocking density for nondecapsulated cysts is approximately 2 g per liter.
When using decapsulated cysts, approximately 5 g per liter can be stocked. These numbers can be doubled through the use of pure oxygen supplementation, which is needed to maintain dissolved oxygen levels greater than 4 milligrams per liter. Attempting to hatch at higher stocking densities can result in physical damage to the nauplii and reduced quality.
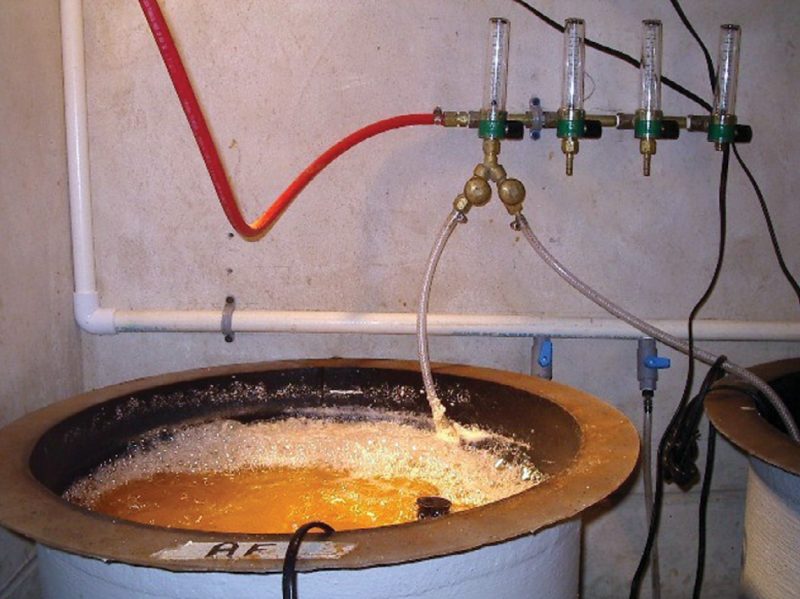
It is important to maintain sufficient aeration at the bottom of the cone to keep cysts suspended (Figure 3). When hatching large volumes of cysts, it is advantageous to use a food-grade antifoam product to minimize excessive foaming in the culture. Hatching times will vary based on strain and age of cysts, temperature and salinity of water, etc. Thus, it is important to minimize variation between hatches for consistency.
Generally, Artemia require 18 to 24 hours of incubation to hatch. Decapsulated cysts, however, may be ready to harvest after only 16 hours of incubation. When feeding nauplii directly to fish, timing of the hatch is very important. If nauplii remain in the hatching tank for too long, they will grow too large and their nutritional quality will decrease. Determining the endpoint of the hatch should be made through microscopic observation of the relative numbers of hatched nauplii, prehatched nauplii, and unhatched cysts.
Artemia Harvesting
The harvesting procedure varies depending upon whether decapsulated or nondecapsulated cysts were hatched.
When harvesting previously decapsulated cysts, simply drain the entire water column into a 125 harvest bag. An air stone should be placed in the bag to maintain oxygen levels while keeping nauplii in suspension. After all nauplii have been collected, rinse them in the bag with clean water for at least five minutes.
After rinsing, attempt to separate the hatching membranes (which remain intact after the decapsulation process) from the nauplii. To do this, place Artemia into a cooler, enrichment tank, or other clean container at a density less than 5 million per liter. Using a micropore oxygen diffuser (Point Four Systems, British Columbia, Canada), oxygen should be injected into the cooler. The tiny oxygen bubbles will adhere to the membranes and they will begin to float after a few minutes, where they can be skimmed from the top. After removing membranes, nauplii are ready to be fed to the larva, transferred to subsequent enrichment, or placed into cold storage.
If harvesting nondecapsulated cysts, turn off the air for 10 to 15 minutes. This will allow nauplii – as well as any unhatched cysts – to settle to the bottom of the cone, while hatched cysts will float to the surface. Keeping the air off for more than 15 minutes may result in Artemia suffocation. Artemia move toward light, so covering the tank and/or placing a light source at the bottom of the cone will aid in separation. After settling, slowly open the bottom drain and purge off the unhatched cysts that will come out first.
Conversely, a standpipe can be placed in the tank prior to settling to allow the bottom 1 inch of settled material to remain undisturbed. Newly hatched nauplii should then be collected in the harvest bag and rinsed for at least five minutes. If nauplii have settled properly, only 75 percent of the water column will need to be drained. While harvesting, check on the relative ratio of nauplii to cysts by transferring a sample to a glass beaker. This will help determine when the harvesting process is finished or if more time is needed to allow Artemia to settle. The nauplii are now ready to be fed to your fish, transferred to subsequent enrichment, or placed into cold storage.
Artemia Counting
Counting of harvested Artemia is necessary to determine accurate dosage rates for feeding and enriching, and as quality control for the hatch. Hatch rates will vary depending on strain and age of cysts, but generally speaking, experienced users should see hatch rates with GSL cysts of 200,000 or more nauplii per gram of nondecapsulated cysts. While there are a number of methods used for counting hatched Artemia (two are presented below), it is important to choose the best one for your situation and stick with it to develop standardized counting protocols for your facility in order to minimize variation.
Method 1:
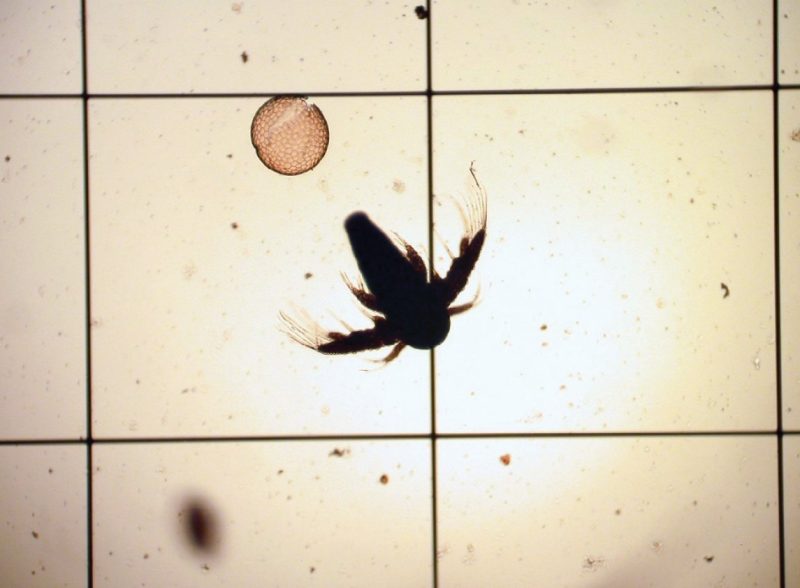
After harvesting and rinsing Artemia, store in a clean, well-aerated container at a density no greater than 5 million per liter. To count Artemia, a small subsample should be collected from the well-mixed storage container and diluted 10-fold. Load a Sedgwick-Rafter slide (Figure 4) with 1 ml of the diluted sample and add one to two drops of formalin or Lugol’s solution to immobilize the Artemia. Count under low magnification and record the number of intact, healthy-looking nauplii. Counts should be conducted two to three times to determine an average. Multiply the average by 10 (rate of dilution) to determine the number of Artemia per milliliter in the storage container.
Method 2:
Concentrate the rinsed Artemia in 10 L of saltwater using vigorous aeration. Collect 10 ml of Artemia and add to 990 ml of saltwater. Collect 1 ml of sample with a pipette and count the number of live Artemia within the pipette. Return the sample to the container, stir, and repeat the process five to 10 times; then determine an average. The average of these counts conducted in this fashion multiplied by 1 million (rate of dilution) equals the total number of Artemia.
Enrichment of Artemia
Rationale
Before being fed to larvae, Artemia nauplii are usually fed a specialized diet in order to increase their size and nutritional profile. While freshly hatched Artemia nauplii are rich in protein and can serve as a bridge between rotifers and enriched Artemia for many species, they are largely void of the beneficial fatty acids required for proper growth and development of most larvae, specifically those of marine species. For the purpose of the following Artemia enrichment procedure, the protocol developed for the use of the INVE product, DC DHA SELCO, will be utilized.
Artemia Enrichment Requirements
Temperature: 25°C
pH: 8.0-8.5
Dissolved oxygen: 4 mg/L >
Salinity: 20-30 ppt
Density: ≤ 300 nauplii/ml
DC DHA dosage: 0.6 g/L
Enrichment duration: 20-24 hours
Artemia Enrichment Procedure
There are a number of commercially available Artemia enrichment products. Because these products have different ingredients, nutritional profiles, and enrichment protocols, it is up to hatchery managers to decide which product is most suitable for their conditions and species. Once an enrichment product is chosen, it is important that standardized protocols be developed and strictly followed. Slight changes in temperature or enrichment time, for example, can have significant effects upon the size and nutritional quality of the final product.
Preparation of enriched Artemia requires a two-day lead time: one day is required for hatching of Artemia (see Artemia hatching protocol) and a second day for the enrichment process. Having a second, dedicated enrichment tank is necessary to facilitate this process. As with hatching, a cone-bottomed tank is ideal for enrichment and helps to ensure adequate mixing and complete draining during harvest. Prior to stocking, the enrichment tank should be filled with a suitable amount of water, and water-quality parameters (salinity, temperature, and pH) must be adjusted to match the requirements listed above.
It is important to begin the enrichment process with healthy, high-quality nauplii. Nauplii that are damaged or sluggish prior to enrichment will result in suboptimal nutrient uptake. Care should be taken to remove hatched cysts (nondecapsulated cysts) or hatching membranes (from decapsulated cysts) as described in the Artemia hatching section. Artemia nauplii should also be rinsed well prior to stocking into the enrichment tank. This is especially important when using an additive such as INVE’s Hatch Controller or antifoam during the hatching process, as ingredients in these products can interfere with enrichment uptake.
During enrichment, vigorous aeration should be applied through the bottom of the enrichment vessel, and dissolved oxygen levels should be closely monitored throughout the process (Figure 5). The use of supplemental oxygen during this stage will likely be necessary to maintain oxygen levels above 4 milligrams per liter. Temperature must also be maintained at 25°C through the use of submersible heaters or ice packs, as dictated by ambient conditions.
Harvest
At the end of the enrichment process, the entire volume of water should be drained into a 125 µm harvest bag with sufficient aeration to keep enriched Artemia in suspension. Oxygen levels should be closely monitored in the harvest bag. The bag containing the Artemia should be rinsed well for five minutes or until the water runs clear. Thereafter, Artemia should be transferred into a container containing clean water of a known volume, aerated vigorously, and enumerated as discussed above. If Artemia will not be fed to larvae immediately, it should be placed directly into cold storage, as described below. Important to note that enriched artemia will be larger, and the larval species size and mouth gape should be taken into consideration. It is important to note that enriched artemia will be larger, and the larval species size and mouth gape should be taken into consideration.
Cold Storage
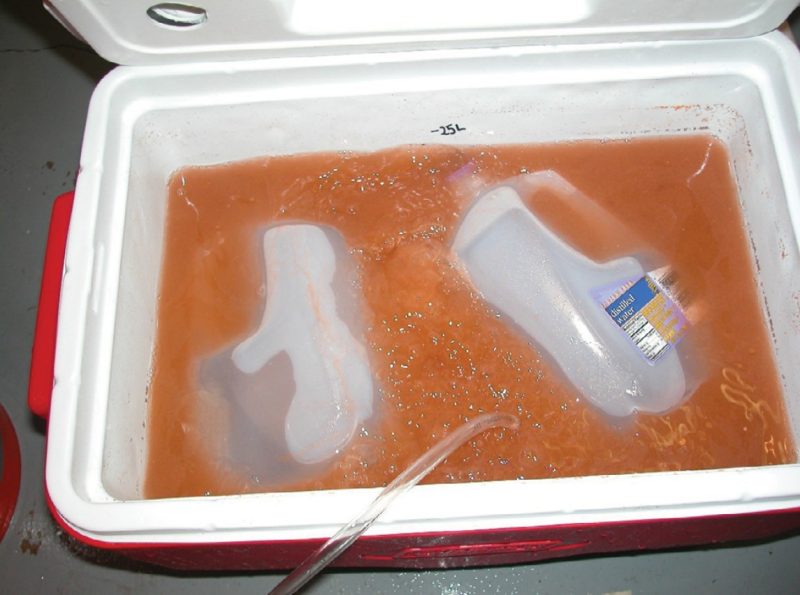
Artemia not fed to larvae or enriched immediately needs to be stored under cold conditions. Cold storage of Artemia dramatically decreases its metabolism, which directly reduces further growth and metabolism of their protein and lipid stores. Artemia should be transferred to a cooler or suitable container and stored at 2°C to 10°C, with adequate aeration to prevent settling (Figure 6). An inexpensive digital thermometer with a 24 to 40 inch temperature probe makes it easy to verify that the cold bank temperature is in the proper range to keep the artemia alive, and maintain protein and lipid stores. Under these conditions, Artemia can be concentrated as high as 5,000 per milliliter and stored for up to 24 hours. One liter soda bottles or water bottles can be filled with salt water, recapped and frozen to make handy ice jugs for temperature control. It may take two to four one liter bottles to maintain the desired temperature for up to twelve hours, so it is important to have two to three times that many ice bottles so that they may be rotated back to the freezer while being replaced with frozen bottles.
This is a joint publication of Virginia Cooperative Extension and Virginia Sea Grant.
Disclaimer: Commercial products are named in this publication for informational purposes only. Virginia Cooperative Extension does not endorse these products and does not intend discrimination against other products which also may be suitable.

Virginia Cooperative Extension materials are available for public use, reprint, or citation without further permission, provided the use includes credit to the author and to Virginia Cooperative Extension, Virginia Tech, and Virginia State University.
Virginia Cooperative Extension is a partnership of Virginia Tech, Virginia State University, the U.S. Department of Agriculture (USDA), and local governments, and is an equal opportunity employer. For the full non-discrimination statement, please visit ext.vt.edu/accessibility.
Publication Date
August 13, 2024
